

 In case of doubts, feel free to contact us.
We are at your disposal.
Regards,
Development Team
 Entersoft - Analysis and Systems Development
 “... Blessed the people whose God is the LORD!” - Psalms 144:15


 Entersoft OuroCash™ - Instruction Manual
System for Financial Control
 2.21 - How to issue receipts and promissory notes
with Entersoft OuroCash™
Entersoft OuroCash™ also has an excellent
module to facilitate your issuance of
receipts and promissory notes.
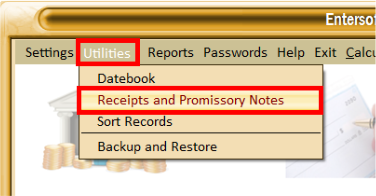
You can access these features by clicking
the "Utilities" menu, and then clicking the
"Receipts and Promissory" menu.
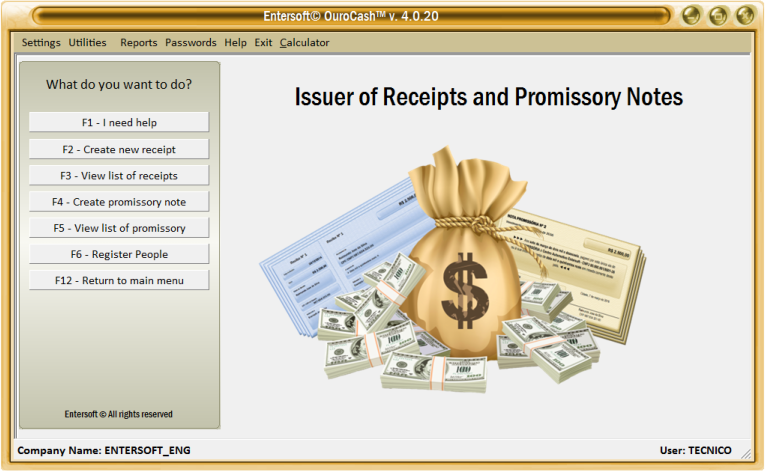
In this module you can create new receipts, view the list of receipts already issued, create new
promissory notes, view the promissory notes already issued, and register individuals or legal entities.
Everything is very easy... see how we created a receipt in a few seconds:
1) We start by clicking the "F2 - Create new receipt" button.
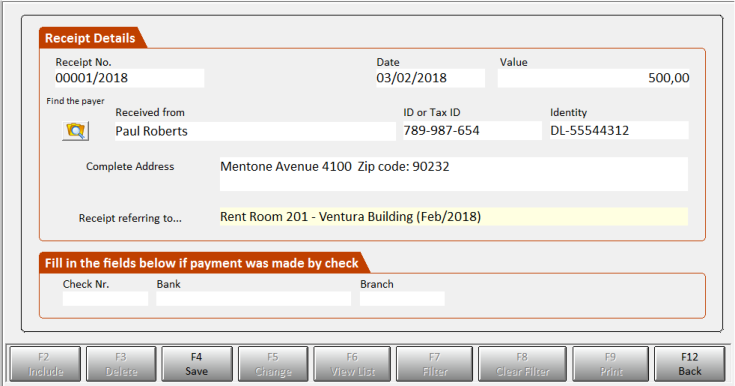
2) Then, we will fill in the fields of the receipt, as the example below:
3) The receipt number is filled in automatically, but we can modify it if necessary... We will fill in the date of
receipt, the value, the name of the payer, identification documents, address, and the details on what this
receipt refers to.
4) When finishing the fill, simply click the "F4 - Save" button.
You can then print the receipt by clicking the "F9 - Print" button.
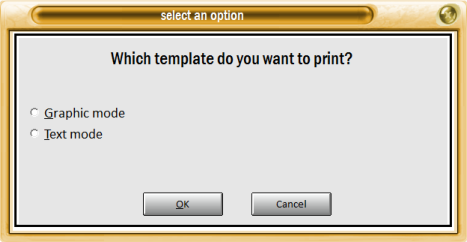
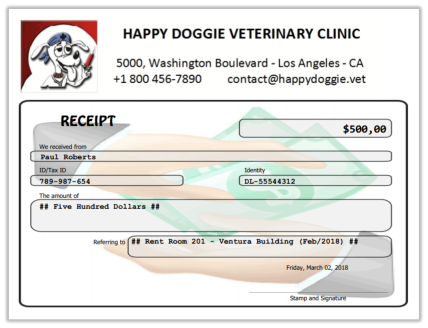
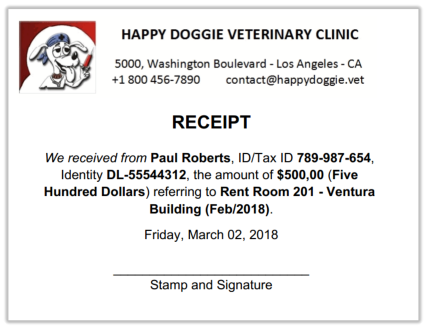
The system will ask you which template of receipt you want to print:
Issuance of receipts:
Issuance of promissory notes:
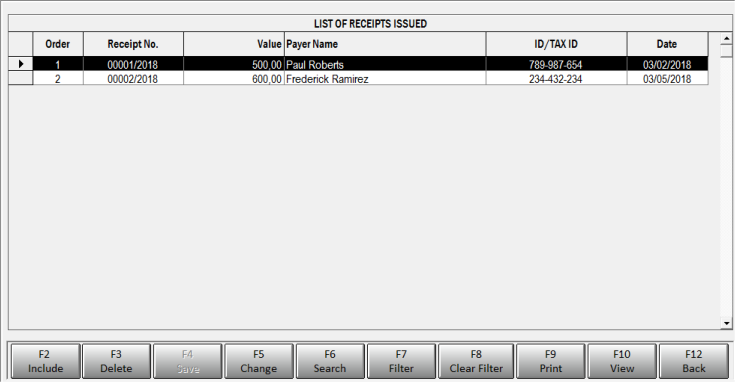
5) Once you have registered a receipt, you can view all the receipts already issued by clicking the
"F12 - Back" button. This screen will also be displayed by clicking the "F3 - View list of receipts"
button from the initial screen of this module.
6) From this screen you can also perform new tasks, according to the following buttons:
 The procedure for issuing promissory notes in Entersoft OuroCash™
is very similar to what was explained when issuing receipts...
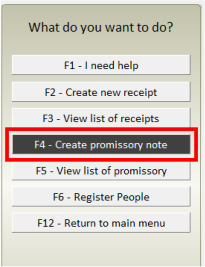
1) From the main screen of the module, just click on the button
"F4 - Create promissory note"
2) You will then fill in the fields of the promissory note,
as shown below:
 Receipt in graphical mode
Receipt in text mode
Promissory Nº ..:
Value ..:
Due date ..:
Number of promissory ..:
Interval between due dates ..:
Information about the drawee ..:
Relation of Guarantors ..:
This field is filled in automatically, but you can enter the
promissory number manually if necessary.
Enter the value of the promissory note.
Enter the due date of the promissory note.
If you are creating multiple promissory notes at one time,
enter the due date of the first promissory.
Enter the number of promissory notes you want to create
(installments quantity). Enter the number ONE if you are
creating a single promissory note.
Enter the number of days of interval between each plot.
For monthly intervals enter the number ZERO.
Ignore this field if you are creating a single promissory note.
Enter the payer source identification data.
Remember that a promissory note needs to be filled in
properly to ensure its legal validity.
Enter the identification data of the debt guarantors, if any.
3) When finishing the fill, simply click the "F4 - Save" button.
4) Notice that the three installments were created in one go, and the system itself calculated the due
date according to the interval we reported:
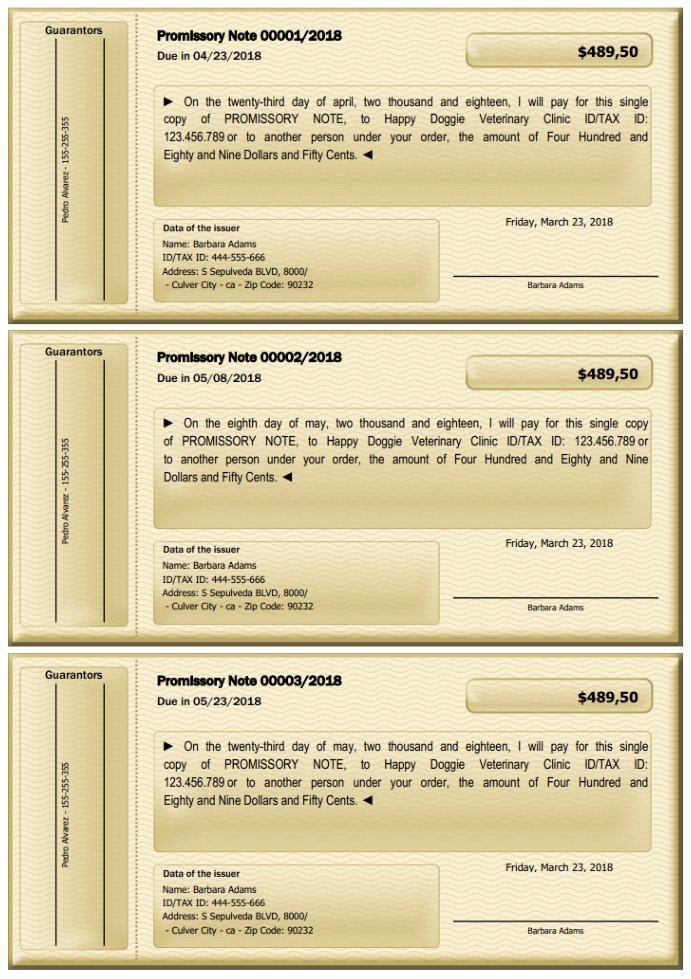
5) Now we can print the promissory note by clicking the "F9 - Print" button... However, since in this case
we create a set with three parts, we can print the whole set at once by clicking the "F10 - Print All"
button:

 Like our page on facebook...


 Copyright © Entersoft Analysis and Systems Development - All rights reserved




 In case of doubts, feel free to contact us.
We are at your disposal.
Regards,
Development Team
 Entersoft - Analysis and Systems Development
 “... Blessed the people whose God is the LORD!” - Psalms 144:15


 Entersoft OuroCash™ - Instruction Manual
System for Financial Control
 2.21 - How to issue receipts and promissory notes
with Entersoft OuroCash™
Entersoft OuroCash™ also has an excellent
module to facilitate your issuance of
receipts and promissory notes.
You can access these features by clicking
the "Utilities" menu, and then clicking the
"Receipts and Promissory" menu.
In this module you can create new receipts, view the list of receipts already issued, create new
promissory notes, view the promissory notes already issued, and register individuals or legal entities.
Everything is very easy... see how we created a receipt in a few seconds:
1) We start by clicking the "F2 - Create new receipt" button.
2) Then, we will fill in the fields of the receipt, as the example below:
3) The receipt number is filled in automatically, but we can modify it if necessary... We will fill in the date of
receipt, the value, the name of the payer, identification documents, address, and the details on what this
receipt refers to.
4) When finishing the fill, simply click the "F4 - Save" button.
You can then print the receipt by clicking the "F9 - Print" button.
The system will ask you which template of receipt you want to print:
Issuance of receipts:
Issuance of promissory notes:
5) Once you have registered a receipt, you can view all the receipts already issued by clicking the
"F12 - Back" button. This screen will also be displayed by clicking the "F3 - View list of receipts"
button from the initial screen of this module.
6) From this screen you can also perform new tasks, according to the following buttons:
 The procedure for issuing promissory notes in Entersoft OuroCash™
is very similar to what was explained when issuing receipts...
1) From the main screen of the module, just click on the button
"F4 - Create promissory note"
2) You will then fill in the fields of the promissory note,
as shown below:
 Receipt in graphical mode
Receipt in text mode
Promissory Nº ..:
Value ..:
Due date ..:
Number of promissory ..:
Interval between due dates ..:
Information about the drawee ..:
Relation of Guarantors ..:
This field is filled in automatically, but you can enter the
promissory number manually if necessary.
Enter the value of the promissory note.
Enter the due date of the promissory note.
If you are creating multiple promissory notes at one time,
enter the due date of the first promissory.
Enter the number of promissory notes you want to create
(installments quantity). Enter the number ONE if you are
creating a single promissory note.
Enter the number of days of interval between each plot.
For monthly intervals enter the number ZERO.
Ignore this field if you are creating a single promissory note.
Enter the payer source identification data.
Remember that a promissory note needs to be filled in
properly to ensure its legal validity.
Enter the identification data of the debt guarantors, if any.
3) When finishing the fill, simply click the "F4 - Save" button.
4) Notice that the three installments were created in one go, and the system itself calculated the due
date according to the interval we reported:
5) Now we can print the promissory note by clicking the "F9 - Print" button... However, since in this case
we create a set with three parts, we can print the whole set at once by clicking the "F10 - Print All"
button:

 Like our page on facebook...


 Copyright © Entersoft Analysis and Systems Development - All rights reserved


